MS Outlook emailing client consisted of two files PST and OST. PST files include the Outlook information which is stored on the hard disk of the PC. Whereas the OST file is the copy of the MS Exchange Server data which is saved on the computer machine. OST file supports saving the Exchange data for offline work. OST file provides the facility to access MS Exchange Server mailboxes data in MS Outlook offline mode. Still, there are conditions, where you feel the need to move OST files into PST. Here is the list of some situations where conversion of OST files into PST provides help in accessing the MS Exchange data.
- MS Exchange server stopped working due to unexpected damage and other reasons
- Switch from one PC to another
- Change in the work environment
- The backup of the OST data
- MS Exchange Server is undergoing maintenance
- Inadvertent data deletion
- Loss of MS Exchange data
The MS Exchange server problems, be it data deletion or data inaccessibility, least affects the OST files as Exchange connection loss also happens at the same time. However, the updated OST data can also be restored soon after Exchange is configured. This creates a need for converting OST in PST so that data can be accessed directly to the MS Exchange mailbox.
For conversion of OST in PST, the manual solutions are mentioned in this article.
Such manual methods are free of cost which users can execute anytime they feel the requirement. Also, these manual solutions can be performed easily by everyone.
Manual Conversion of OST in PST:
Here are the two methods for converting the OST data into PST:
- First Method – Archiving OST to PST
- Second Method – Export Facility in MS Outlook
Note: Suppose you want to export only a few emails of OST file to access then forward them as emails to a reliable email address. You can also opt for Drag and drop method for accessing OST files in the new PST file. This method is useful for only a few emails and not for huge data.
Archiving OST to PST: Here it is important to know that archiving method is successful only for emails and cannot be executed for exporting contacts calendars etc.
To carry on with the process, first, enable the archive for saving the OST emails to the new archive PST file. The OST files need to be accessed in the MS Outlook client and the Exchange server connection should also be there. Here are the steps to enable the archive:
- First, open MS Outlook emailing application. After this, Find ‘File’ and ‘Options’.
- In the next step, click ‘Advanced’ and go to AutoArchive and click the AutoArchive Settings.
- Once the AutoArchive window gets opened, start adding the values as per the requirement to AutoArchive frequency such as days, deletion of the old data, and so on. After this, browse and begin with adding the PST location to save the OST archived data. Once you are done with AutoArchive settings, press OK button.
- This has archived all the OST emails in PST at the selected location.
Note: As already explained that The Archiving feature is useful for maintaining the Outlook file size or deletion of the old items. Thus you can utilize it for fulfilling these requirements.
You can also use the following step:
- Go to File << Info << Cleanup Tools << Archive to utilize this facility for manual conversion of old items according to time and days from OST in the Archive folder.
Export Facility in MS Outlook:
MS Outlook editions instilled with Import and Export feature for exporting OST files in PST file. The prerequistite to use this feature, OST should be connected with MS Exchange Server during the time of export. Besides this, the feature is beneficial for seeking the local as well as the portable backup of Exchange data. Let’s understand this with the help of the process given below:
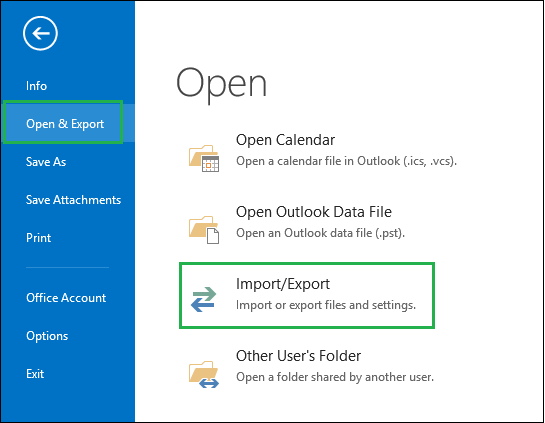
- First, run MS Outlook emailing client. Go to ‘File’ and then find the ‘Open & Export option, and after that click ‘Import/Export’.
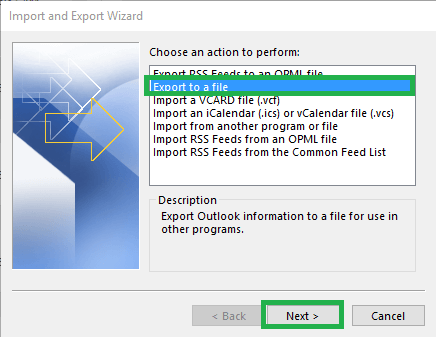
- Now, from the available options, choose ‘Export to a file’ option as shown in the screenshot below:
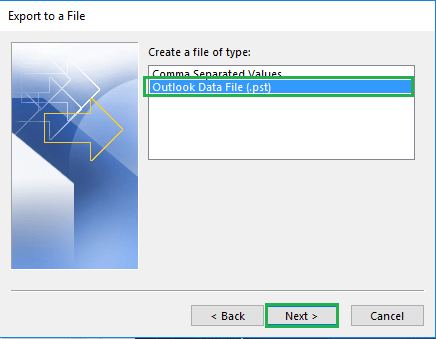
- This step will proceed with the file type for saving the OST data. Here you will choose the ‘Outlook Data File (.pst)’ option and press the ‘Next’ button.
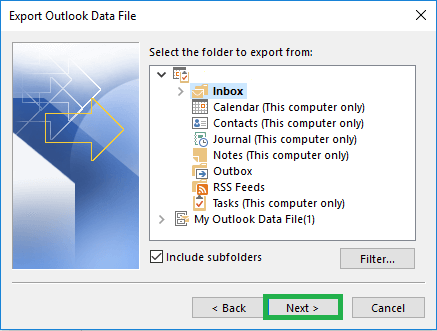
- Export the Inbox folder to PST. You can choose from the folders and from the checkbox that Includes subfolders. After this, press ‘Next’ to continue.
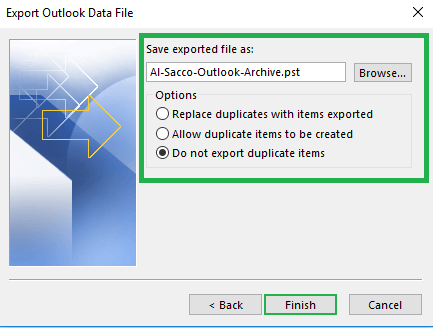
- Now, you will Browse for entering the PST file address location on your PC. You can select any option you want for managing the duplicate items and Press the ‘Finish’.
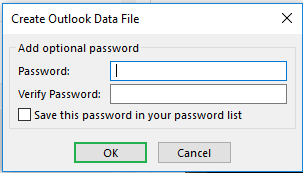
- Add a password for protecting your PST file. The conversion procedure will begin and take time as per the quantity of data available for conversion.
This method is workable for limited data conversion and when Exchange works well. In manual methods, data loss or loss of properties also common scenarios to happen. Therefore, the native solutions are fit for a small amount of data conversion rather than a huge. While using the manual methods, ensure that Outlook is connected with MS Exchange server till the process comes to an end. This is the reason, manual solutions fail to export orphaned OST files or in the situation where it is Exchange downtime or under maintenance. Overall, the process is time-taking and slow.
Users having large OST data can convert OST data in PST safely with the help of GainTools OST to PST Converter. This application supports converting OST files in PST without keeping in view the file size limit. The tool also supports all Outlook and Exchange versions. This handy third-party software takes only a few minutes in moving the data from one platform to another.
Conclusion: MS Exchange OST file can be moved to PST in various situations such as when it is Exchange server downtime, corruption in MS Exchange, backup requirement, and so on. The free manual methods such as archiving and Exporting features in Outlook are fully described in this article. It is also suggested that external software for OST to PST migration is automated and quick to perform conversion method.
Refer: Repair OST File in Outlook

