Overview: Your wait is over if you seek the finest conversion support from Office 365 to Outlook.com. The blog provides information on a powerful application that helps users to migrate Office 365 to Outlook.com seamlessly.
Table of Contents
Office 365 Vs. Outlook.Com
Both Office 365 and Outlook.Com are cloud-based applications. Office 365, a paid program by Microsoft, stands out with its comprehensive emailing, document management, scheduling, messaging, and more features. These features make it a robust choice for businesses.
On the other hand, Outlook.Com is a simple utility for day to day management of emails and contacts. While the Microsoft product is not as popular as Office 365, it is a free tool for email management, making it a popular choice for personal use.
A Manual Solution to Move Office 365 to Outlook.Com
Yes, there is a manual solution that allows you to access Office 365 data in Outlook.Com. Below are the steps to follow.
1 Stage: Configuration of Your Office 365 Account with MS Outlook for Windows
- Access your Outlook application
- Navigate to the “File” menu and then the “Add Account” button to provide the Office 365 email credentials.
- As the configuration process is done, Outlook will sync emails from your Office 365 account.
Also read: Office 365 Backup Mistakes to Avoid Data Loss
Stage 2: Conversion of Office 365 Emails to PST File Extension
- In the Next step, in Outlook, navigate to the “File” menu > Open & Export > Import/Export.
- Choose the “Export to a file” option and then the “Next” button.
- Select the “PST” file extension and Next tab.
- Select the Office 365 email account or the folder of your choice and then “Next”
- Save the PST file to a local folder and click “Finish”.
3 Stage: Configuration of the Target Outlook.com Account in Outlook for Windows
- In Outlook, navigate to File > Add Account and enter the account credentials of your Outlook.com credentials to start the sync process.
Stage 4: Import The PST File into Your Target Outlook.com Account
- In Outlook, go to File > Open & Export > Import/Export
- Select the “Import from another program or file” option and then the “Outlook Data File (.pst)” option.
- Now, locate the target PST file holding Office 365 data and press “Next”.
- Now, choose the added Outlook.com account to give the tool command to sync data in the account and press “Finish”
Downsides of the Following Manual Process
- This manual process may sound attractive because it is free if you are technically skilled. However, it is not meant for novices.
- It’s a technically intricate process, involving four main steps and their sub-steps, which can be a challenging but rewarding endeavor, requiring significant time and effort.
- It is not a viable option for everyone, especially those who don’t have MS Outlook for Windows.
- The process will kill your time and may lead to data loss if you have made mistakes in steps.
A Professional Solution to Migrate Office 365 to Outlook.Com
Outlook.Com and Office 365 are cloud-based applications. Both of them support the IMAP protocol. Therefore, a highly recommended tool is the one supporting IMAP to IMAP conversion. Gaintools Cloud Migration is one of the best applications to export Office 365 data to Outlook.com without hassles. This straightforward solution doesn’t need the installation of MS Outlook or any other applications. It is an independent conversion program.
Explore the Attractive Features of This Application
- This independent program seamlessly converts one IMAP account to another, ensuring data quality is never compromised.
- The utility is lightweight and free from bugs. It is a safe alternative to transfer data.
- The application automatically establishes a connection between two IMAP accounts as users provide their credentials.
- During the backup process, it can export data from all folders or a specific folder, such as Inbox, Draft, etc.
- This application offers two types of advanced filtration support. One is the filtration and export of emails by subject, From, or To, and the other is the filtration and export of data by date range. These features give desirable control over migration results.
- This advanced application creates a backup of Office 365 account data in a specific existing folder of Outlook.com or a new file that this tool can instantly create. The conversion quality is unprecedented. The tool exports emails with all their properties intact and unified, and there have been no cases of attachment loss.
- One of the most incredible features of this application is its unlimited validity. The licensed version is valid for unlimited duration to export unlimited data.
Steps to Migrate Office 365 to Outlook.Com
- Launch this application on your Windows system

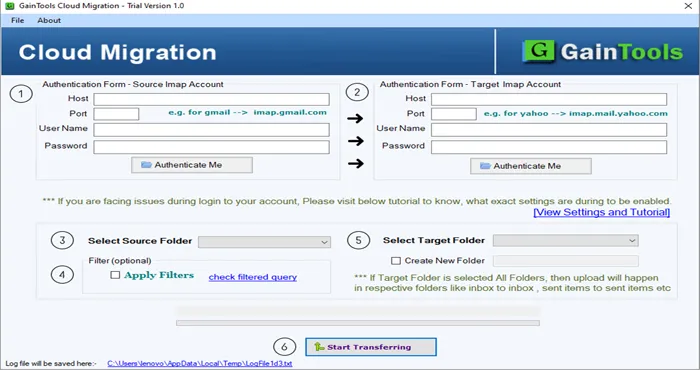
- Provide the Host, Port, User Name, Password, and Security Option of the target Outlook.com for configuration.
- Next, enter the Host, Port, User Name, Password, and Security Option of the Office 365 account.
- The tool shows the folders of Office 365 in its left panel. Uncheck those that you don’t want to export.
- Now, for Outlook.Com, choose a folder where you want to save data or create a new folder.
- For advanced filtration, you can check the “Apply Filter” option and select the date range or enter “From, To, and Subject.” (they are optional features).
- Next, press the “Start Transferring” tab to resume the process.
(Note: this application works when the internet connection is smooth.)
Conclusion
Manual solutions are useful when you are technically savvy and want a cost-effective method without a timeframe. A third party is the best alternative when there are a large number of files to export, and you want an effortless solution. Carefully decide on an ideal solution for migration.

